How to solve a Rubik's cube and preserve the nervous system. How to assemble corner and edge elements in the third layer of a Rubik's cube How to solve a Rubik's cube corners of the last layer
For children and adults sometimes the task may seem overwhelming how to solve a 3x3 rubik's cube. A diagram with pictures for beginners in this matter is one of the main assistants.
Also, to make everything clear and transparent, you can use video instructions. We will actively use both of these aids in practice so that you finally learned how to solve the eternal problem with a Rubik's cube.
You can solve a Rubik's cube different ways and methods. You can do this in 15 moves, 7 moves, or even as many as 20. For many years, all sorts of smart people have been struggling to find the optimal solution to this problem. After all, the Rubik's cube is a mechanical puzzle that can be solved quite logically. All you need is step-by-step instruction, as well as a small supply of logic and patience.
Before starting the assembly algorithm itself, you should learn key concepts.
The name of the toy speaks for itself - the cube consists of 6 sides (faces), 12 edges, 8 corners. The faces of the cube consist of 9 small colored elements that can rotate simultaneously, but only clockwise and counterclockwise. Letters of the Russian alphabet the names of the faces will be indicated as follows:
F – facade;
T – rear;
P – right;
L – left;
B – top;
N – bottom.
 Many descriptions and diagrams contain designations for the faces of the cube in English.
 The next secret of the Rubik's cube lies in the arrangement of small colored elements.
- Central cubes Determine the color of the entire side of a Rubik's cube. We will call these cubes by analogy with the name of the faces (F, T, P), etc.
- Edge cubes are adjacent to two faces at once, therefore the name will be double (for example, FP, PV) - depending on the faces with which they interact.
- Corner cubes contain 3 letters in the name at once, since they refer to three faces simultaneously (FPV).
And one more mini-secret - when you study the face rotation patterns, letters without any additions will mean rotate 90 degrees clockwise, and letters with an additional sign ' - counterclockwise.
Having understood all these symbols, it will be much easier for you to solve the Rubik's cube and you will do it correctly and quickly. Also, for a change, you can learn how to do.
How to solve a 3x3 Rubik's cube: the easiest way, assembly diagram
The simplest and reliable way Assembling our Rubik's cube begins with the lower cross. Make a cross on the bottom edge of the cube and proceed to a step-by-step solution to the problem of how to solve a 3x3 Rubik's cube: the easiest way, the diagram of which is right in front of you.


 And, of course, the most understandable guide for assembling a cube is a video lesson with detailed description an experienced virtuoso.
Scheme for assembling a 3x3 Rubik's cube for beginners in pictures
In the first stages of practicing solving a Rubik's cube, we will use the same cross method, but this time we will have a cross made of colored cubes on the top edge. As you understand, high-speed solving of the Rubik's cube awaits you ahead, at this stage you should learn to correctly determine the location of the edges and moving them in the plane of the cube.
 There are different methods for solving a cube, and Now you have to learn how to solve a 3x3 Rubik's cube: the scheme for beginners consists of 7 stages. Pictures describing the assembly process are available for each step. You may spend more time on this puzzle than expected, but you will solve a problem that not everyone on our planet can achieve! It's worth the sweat.
By the way, the last one world record for solving a rubik's cube was set to speed in 4.73 seconds. And it belonged to Australian student Felix Zemdegs, who defeated the previous record holder by just 0.01 seconds. We are in no hurry in this matter, so we carefully study the instructions and begin to assemble the first layer.


The principle of assembling a Rubik's cube from the starting cross not that complicated. Here it is necessary to correctly study the location of the edges. And then it’s a matter of technique, as they say. We have already gone through the basic concepts and rules for assembling a Rubik's cube for dummies.
We are sure that the diagram for assembling a 3x3 Rubik's cube for beginners in pictures helped you set your own record and in further attempts you will reduce the time to a minimum.


If all these steps and formulas seemed complicated and confusing to you, we suggest you watch the video, which shows the whole process in detail using the example of a virtual Rubik's cube.
3x3 Rubik's cube formulas: calculating moves
If you think that previous methods of solving the notorious cube were intended exclusively for stupid people, catch a few formulas.
Here we are at the finish line!!! The cube is already impressive in its appearance, and the remaining steps are only to unfold or, as they say, correctly orient the corners. It won't be that easy, but we're ready for it, right?
A little bit mandatory theories.
The corners change only in pairs, and I’ll warn you right away, after turning the first corner with the formula, the rest of the cube will break, and after turning the second it will return to its original state. The angle we turn is on the near right side to us.
Possible situations of cube positions
There are two possible situations for the position of the cube:
 In such a situation, we move counterclockwise.
The formula is: R' D2 R F D2 F' (P' N2 P F N2 F')
I call this formula . Because in it we start from the right side.
How to quickly determine that this particular formula is needed? Look at the top sticker of the corner (red in the picture), it needs to be moved down, that is, as if lowered to this edge.
The second case is when the movement is clockwise.
The formula is called - FD2 F' R' D2 R (FN2 F’ P’ N2 P)
As you understand, it got its name because of the first turn of the facade (front).
You can quickly understand that this particular formula is needed using the method of exclusion from the previous formula.
We know the formulas, now how to apply them correctly. Do you remember that angles change in pairs? To do this, we will apply these formulas in pairs. Find two angles, such that one becomes the correct “side” formula, and the second “front”.
IMPORTANT: first we place the cube so that the cube is in near right corner(as in the pictures), and only then we look at whether to use “side” or “front” for it.
We put it and twist it:
We don’t twirl the cube itself in our hands, and hold it the same way!!!
We see that the corner is turned, and the rest of the cube is broken :)
Let's fix the situation twist the top, putting the second one not assembled corner to the desired position:
Here we apply the formula
Then we return the top to its proper place and have two correctly rotated corners.
In the same way, you can first twist the “side” and then the “front”. The main thing is that after one formula comes another - after “side” there is always “before”, and after “front” there is always “side”.
In this pairwise change of two corners we change all the others.
What other situations are there?
Well, of course, it happens that all the corners are immediately in place, then we just enjoy the job done)
It happens that one corner is already turned correctly, but three are not. Well, let’s turn one of the three into the “right direction”, and select the second from those not collected. After the situation is reduced to the one indicated above, the second corner will not unfold correctly and you will end up with two unassembled corners. In one more pass we put them in place.
After a short (I hope everything works out for you right away) torment, you will get this picture:
CUBE COLLECTED!!! CONGRATULATIONS!!!
Video: placement of corners on the last layer
I wish you good luck in the vast world of the Rubik's cube!
In the previous step, we solved the Rubik's cube in such a way that all the cubes fell into place. To complete, all we have to do is correctly rotate the corner cubes of the upper axis, and the Rubik's cube will be solved.
There may be two, three or four corner cubes in the top axis that are not rotated correctly. If available two corner cubes, incorrectly rotated, let's carry out the following solution in one way or another, depending on our case.
READ BEFORE MOVEING THE CUBES!
Very important: This step is not as easy as the previous ones, however, and not very difficult. Before you do it, you need to know something. There are several subcases in Case 1, so first of all, determine which subcase is yours. For this step, perform the first series of movements. Then carry out the movements shown on the red background that correspond to your case. Finally, follow the last movement phase.
Case 1: (Read the information above first) Two corner cubes are turned incorrectly
The “nearest” corner cube must be moved clockwise. 
Cases 2 and 3: Three corner cubes are turned incorrectly
If the three corner cubes are rotated incorrectly, position the Rubik's cube as shown in the pictures and follow the first of the above solutions, rotating only the two corner cubes. Then follow the solution according to your case.


Case 4: All corner cubes are incorrectly rotated
If all four corner dice are rotated incorrectly, apply the first of the above solutions. Then - a decision according to your case.
Instructions “how to solve a 3x3 Rubik's cube” with pictures and formulas for beginners. The lightest and simple circuit, but will require attention and accuracy from you. This is the second (improved, more complete and convenient) edition of the instructions for assembling a Rubik's cube; it takes into account the wishes of our readers. The instructions are suitable for solving a Rubik's cube yourself and teaching your child.
Step 1. Solve the first side of the Rubik's cube
This step details how to solve one (first) side of the Rubik's Cube with the first belt. There are many possible options at this step, so it is difficult to describe them all. It is recommended not to memorize formulas, but to understand their essence, then you will be able to cope with any situation.
You can skip this step
If you can solve one side of the Rubik's Cube and the top belt (Figure 1-1c) without formulas or outside help, move on to .
1.1. Volumetric cross of the first side
On one side of the cube we will assemble a cross, the colors of which correspond to the central squares of the other sides (Fig. 1–1b).
Action 1. Find the appropriate rib cube (Figure 1-2) and rotate the front side to move the cube upward (Figure 1-3). Then proceed to step 2. Repeat steps 1 and 2 as many times as necessary.

If the rotation “breaks” already solved cube, move the found cube to another plane (Fig. 1–4a, b). If the cube is not yet on top, go to step 1 again.

If moving to another plane will also “break” an already assembled cube, use the appropriate formula (Fig. 1–4c).
The figure (Fig. 1–4c) shows only one of the possible options - proceed by analogy.

Action 2. When the found cube is moved up, use one of the formulas.


1.2. Side and belt
To arrange the corner cubes and complete this step (Figure 1-1c), you will need the following formulas.


To remove an irregular corner cube, use formulas.


If the cube is “hidden” at the bottom, then we move it to the lower belt, so that we can then move it to its place using the formulas above.

Step 2. Assemble the second belt
The second belt is easily assembled using two formulas. Find a suitable cube in the third belt so that both colors match (twist the third belt if necessary), and move it diagonally to the second belt using the formulas.
Formula: (N’P’NP)(NFN’F’)

Formula: (NLN’L’)(N’F’NF)
If there is no suitable cube
If there is not a single suitable cube, using the same formulas, move any cube from the third belt to the second - the desired cube will appear.
Step 3. Cross on the opposite side
Now you need to assemble a cross on the opposite side of the Rubik's cube. The cross is assembled without taking into account the colors of the third belt (Fig. 3-1). In other words, at this step only the cross is assembled, and the cross is coordinated with the colors of the third belt at the next step.

Your Rubik's Cube now has one of four combinations: a, b, c, d - see Fig. 3–2. The transition from one combination to another occurs using a single formula: F P V P" V" F". You need to repeat this formula 1-3 times, depending on what combination you have.
If the cross is already assembled (Fig. 3-2d), skip this step. If you only have one center square (Figure 3-2a), then you need to repeat the formula 3 times. If the angle (Fig. 3–2b) - 2 times. If the line (Fig. 3–2c) - 1 time.

Formula: F P V P" V" F"
note
Before each execution of the formula, the Rubik's cube must be positioned exactly as shown in the pictures.
Step 4: Coordinated Cross
As a result of this step, we will get a cross that matches the colors of the belt (Fig. 4-2c).
Rotate the top belt until the 2 colors of the cross match the middle squares of the top belt (Figure 4-1). Only two combinations are possible: the colors match the line Fig. 4–2a) or the colors coincide at an angle (Fig. 4–2b).

Formula when the line matches: P V P" V P VV P"
We move the incorrectly placed cross cubes located opposite each other (two opposite ends of the cross).

After completing this formula, rotate the top belt again until the 2 colors match the middle squares of the top belt (Figure 4-1). Please note that even now the two ends of the cross will not fall into place, but the combination will change to “colors coincide at an angle” (Fig. 4-2b).
Formula when the angle coincides: P V P" V P VV P" V
Swap incorrectly placed cross cubes located diagonally relative to each other (two adjacent cubes cross).

After completing this formula, the cross will be assembled and its side colors will match the colors of the upper belt (Fig. 4-2c). If the result is not achieved, then repeat this step again, first orienting the cube correctly.
Step 5. Arrangement of corner cubes
Corner cubes are arranged using two formulas. After applying these formulas, the corner cubes will remain in place (in their corners), but may not be rotated correctly. In Fig. 5–1, a black dot marks a cube that is placed in its place (in its corner), but turned incorrectly. The cubes are unfolded in the next step.

Right turn formula: (P’F’L’F)(PF’LF)

Left turn formula: (F’L’FP’)(F’LFP)

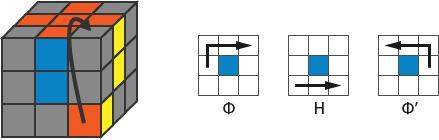
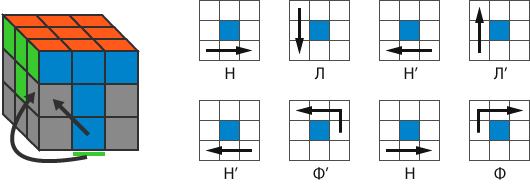
Step 6. Rotate the corner cubes
The reversal of all corner cubes is performed by the simple formula P'N'PN, performed many times. Before you begin, please read the entire section thoroughly and make sure you have no questions.
note
After starting to execute the formula, the Rubik's cube will “collapse” and will finally be solved only after all the corner cubes have been correctly deployed. In other words, all the corner cubes are unfolded in one operation, which will require your attention and endurance.
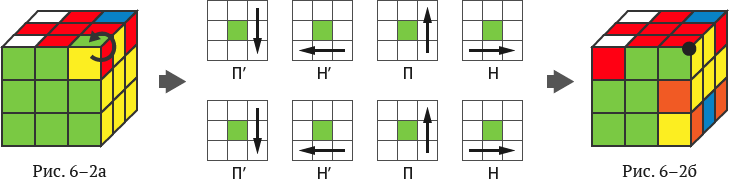
Let's find the corner cube that needs to be turned (counterclockwise or clockwise - it doesn't matter), see Fig. 6–1.

Take a Rubik's cube as shown in the picture below and complete the formula.
note
1) The formula (of 8 moves) must be performed 1 or 2 times until the corner cube turns over to the correct position (Fig. 6-2b).
2) When the corner cube rotates to the correct position, the Rubik's cube will "collapse" - don't worry, the Rubik's cube will only be solved when you are done with all the corners.
3) Do not change the position (do not turn over) the Rubik's cube in your hands until the end of this step.
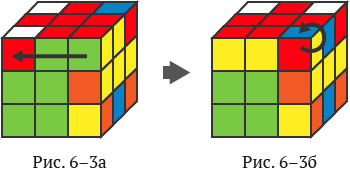
When the first corner cube is already correctly positioned (Figure 6-2b), rotate the top layer (Figure 6-3a) so that the next corner cube moves to the upper right corner (Figure 6-3b). If the next corner cube is already turned correctly (does not require turning), rotate the top layer again (Figure 6-3a).
Again perform the 8-move formula (1 or 2 times) and follow all the above recommendations. These steps must be repeated until all the corners are turned correctly - until the Rubik's cube is completed.
I wish you patience and success!
Support the site
If the article helped you, please help us develop the site. Thank you!
How to solve the corners of the last layer of a Rubik's cube 3x3 diagram - STEP 6.
We will assume that you have completed the previous stages, and have come to the sixth step with a 3x3 cube, which has two lower layers and a yellow cross on the last layer (hat). In the illustration below, we have depicted the state in which your cube should be.
The picture above shows a 3x3 Rubik's cube with a solved
cross on the last layer and assembled two lower layers.
At the end of this step, all the corner cubes of the last layer should be in place. Orientation doesn't matter, since in the last step of assembling the 3x3 puzzle, we will be rotating (orienting) all the corner pieces.
In the illustration, we drew a 3 by 3 Rubik's cube at the end of this stage. Your cube should look something like this.

The picture shows a 3x3 Rubik's cube with the bottom two layers assembled,
a yellow cross on the last layer, and correctly placed corner elements.
Now we move on to two easy algorithms for beginners, for rearranging the three corners of the last layer.
Schemes for arranging the corners of the last layer of a 3x3 Rubik's cube
At this stage of assembling a 3x3 Rubik's cube, you will be faced with the fact that there are three or four corners on top layer, will be located out of place.In the figure below, we tried to depict this.
On the right side of the cube from above, you see two cubes green-red-yellow (near) and green-yellow-orange (far). And as you understand, they need to be moved to the green side (facade).
This is called putting the corners in their places!

The picture shows a 3x3 cube with an incorrect
placed corners on the last layer of the assembly.
How to solve the corners of a Rubik's cube 3x3 scheme No. 1
The principle of operation of this scheme of the penultimate stage easy assembly Rubik's cube, quite simple. The three corner cubes of the top layer will move clockwise as shown in the picture.
The image shows how they will move
corners of a 3x3 cube under the influence of this formula.
Look carefully. If one of the corners of the last layer is already in place, take the cube so that this corner is located in the far left corner. And follow the formula below.

The animation above shows a diagram that moves the three corners of the last layer of a 3x3 Rubik's Cube clockwise.
After completing this assembly diagram, check that the corner that you placed in the far left-upper corner should remain in its place. And the other three corners should move clockwise, as shown above.
Rearranging the corners of the last layer, scheme No. 2
The second scheme for arranging the corner elements of the top layer, a mirror image of the first. It consists of only eight movements. We hope you notice the repeated movements of the sides. All you have to do is remember all these movements.For those who are too lazy to learn this formula, let's reveal a secret - you can get by with only one scheme. You just have to repeat it not once, but twice.

The figure shows the movement of three corner
elements of a 3x3 cube counterclockwise.
As before executing the first scheme, you look to see if there is a corner that is already in place. If there is one, take the cube so that it is in the upper-left-far corner and perform the algorithm.
If there is no such corner, do one of the diagrams for this step, and then look for a corner that is in its place. Orient the cube and do the formula again.


