What can you do with a world map? Geographic maps in the interior: unusual use of banal things
There is a traveler in the soul of each of us. And even though not everyone manages to travel around the world, we still dream about it and, whenever possible, we visit other countries. Geographic maps in the interior can be viewed endlessly. World maps not only give aesthetic pleasure from contemplation, but also create a light atmosphere of romance and adventure, evoking pleasant thoughts about distant countries and memories of your trips. We invite you to see how you can use world maps in the interior of your home.
1. Geographic maps in the interior as wallpaper
A geographical map on the wall will become the central decorative element of the room's interior. Today we will not consider the standard accommodation option big map world on the wall in a frame or simply pinned with buttons. But if you have a large geographical map, you can completely cover the wall with it. In addition, now you can purchase or order photo wallpaper with the image of your choice or vinyl decorative wall stickers. Maps in the interior can be modern, ancient navigational or abstract stylized. This could be a map of the world, parts of the world, a country, a city, or a metro map. Most often, bedroom walls are decorated with images of a world map, but you can decorate the walls in this way in any room - bathroom, children's room, living room or kitchen. You can use different themed children's wall stickers.


A very interesting option for a children's room. Climbing holds are fixed on the wall with a geographical map, and soft mats are underneath them.


Pay attention to the map - it is made in a fantasy style and is also “upside down”. Instead of continents there are oceans, and in place of water spaces there are kingdoms.

For interiors with modern modern and high-tech styles, stylized images of continents in the form of dots, lines, letters and other artistic techniques are suitable.


2. Geographic maps in the interior in the design of the floor and ceiling
While decorating walls with geographic maps is quite common, it is rare to see such decorations on the floor or ceiling. Nevertheless, this is also an interesting and original option. Don't turn the entire room into a world map. If you decide to decorate the floor with cards, you don’t need to decorate both the walls and the ceiling with them, it’s enough to support the general theme small maps world in frames on the wall or in accessories.


Although here is an interesting solution, when photo wallpaper depicting a geographical map smoothly goes onto the ceiling. But in this case, in order not to overdo it, there are no more items with cards in the room.

3. Decorate doors and windows with world maps
Geographic maps in the interior can be present as curtains or roller blinds on the windows. They can be made either with your own hands or ordered from manufacturers.


4. Furniture with maps
World maps can be used to decorate various furniture. Geographic maps cease to be just maps, turning into decorative coverings for cabinets, chests of drawers and other pieces of furniture. As a rule, a paper map is glued to furniture using the decoupage technique. And it looks much more interesting than just hanging a map on the wall.

Any chest of drawers decorated with cards will be unique. You can either completely cover the entire surface of the chest of drawers or decorate only the drawers. 


You can decorate cabinet doors in the same way.

And in this chair and table there is decoupage in its purest form. Geographic maps cover all furniture parts, from legs to crossbars on the back.


5. Lamps with geographic maps
Maps of the world, illuminated from the inside by a lamp, acquire three-dimensionality and look very unusual. But glue geographic Maps It’s better to use factory lamp shades and shades for safety reasons, and even cover everything with a fire-retardant compound for fabric or wood.


6. Geographic maps in the design of interior items
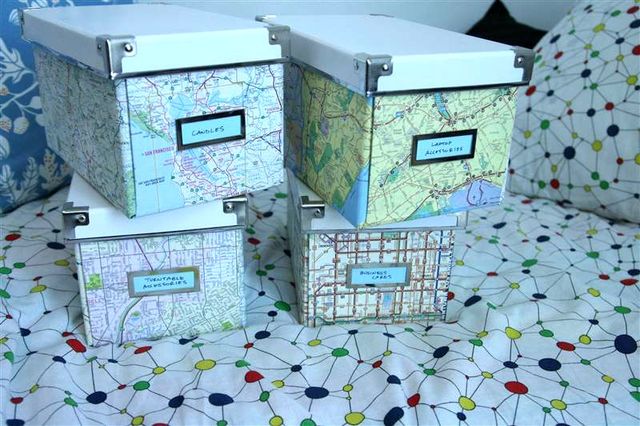
Many small items and accessories will support the geographic theme of the interior. Pictures and photo frames, boxes and stands, watches and dishes - you can cover all this with cards or make decoupage. Nowadays, with the active use of GPS navigators, paper road maps have become practically unnecessary. Therefore, you can easily collect from friends and acquaintances different cards and make a lot of cute and useful things for your interior out of them.


Any maps can be used in the interior: precise geographical or political, fantasy, ancient or super-modern - depending on what result you want to get.

The basic rule: there should not be many other decorative elements, and they should not distract attention to themselves. Let the world map in the interior become the main component, and the surroundings become a calm background for it.
As a rule, the map itself, that is, a drawing earth's surface, placed on one of the walls, covering the remaining walls with neutral light shades, for example, beige, olive, white.

If the room is small, then the world map on the wall should not be multi-colored. It is best if the continents are indicated in one tone, the water surface in another, and these tones are not too bright.
This solution will help to visually enlarge the room. Typically, this option looks good in a room for any purpose - such as a bedroom, nursery or living room.

Photos in the interior of the rooms
Maps in the interior can be anything, for example, a map of your city or the city where you like to relax, a metro map or your region will not only decorate the interior, but can also serve its intended purpose - quickly find a particular locality or route required route.

An interesting idea is the visual division of space using maps. For example, in the work area - wallpaper with a map or diagram, and in the bedroom - any other type of decoration.
Try to use the colors that are used in furniture upholstery, curtains, and decorative elements of your interior.
Living room
Those who love to travel enjoy marking places they have already visited on maps and plotting future routes. For such people, cards in the interior have special meaning.
If you paint the outlines of the continents on one of the walls, indicating individual cities, then you can make such marks directly on the wall. It will work out interactive map, which will serve not only as decoration, but also as a kind of informer.


Kitchen
It can be quite difficult to place a world map on a kitchen wall: usually the entire space is occupied by wall cabinets and household appliances. In this case, you can use a small map in the form of a poster, or apply a drawing of a geographic map to roller blinds.


Another option is to order an apron for your work area with maps on it.


Children's
The most “correct” map of the world in the interior of a children’s room is a classic geographical one, which gives an idea of the real picture of the world. After all, for a child this is, in fact, not just a design element, but a real geography textbook. However, it could also be a map depicting the world of his favorite children's books.


Bedroom
When decorating a bedroom, the map is usually placed on the wall adjacent to the headboard.


Cabinet
Traditionally, the best choice is to place a world map in the interior of the office. If a separate room for an office is not allocated, then the map will help to visually highlight the work area in the living room or bedroom. Here they can be hung on the wall in frames, or mounted on sheets of plywood and hung above the desktop.


Bathroom
The bathroom, decorated in a marine style, will be successfully complemented by maps of great geographical discoveries. Cards can be used both in decoration (wallpaper or tiles) and as decorative elements (bath curtains or posters).


This is one of several map drawing tutorials I create for , an amazing group that I help grow.
If you used this lesson, tell me, show me, I would really like to see what you came up with! And don't be shy, ask questions too!
For this tutorial you will need a font Booter Zero Five(See the link at the end of the lesson).
This map making tutorial involves (imaginary) maps that look more like fantasy or pirate maps. There are no environmental elements on them. If you want to create a map for your world / just because / or for something else, you will get it, in just one hour of work!
Before we begin... you'll need Photoshop, a map file, and a font (see link at end of tutorial). It would also be a good idea to have on your computer a scanned photo of some landscape that you would like to depict. I used Photoshop CS3 Extended to create my map. I also used brushes for some parts of the work.
STEP 1
Take a close look at this screenshot. Don't forget to Save it As... and create a layer for the background.
STEP 2

Click on the picture to view the image in full size and 100% quality.
If you have a sketch, scan it or open a photo. Open it in a separate PS file, increase its brightness if necessary (Image – Adjustments – Brighten/Contrast). Insert an image by dragging it onto the map file. You can resize an image in two ways: either by clicking Edit – Transform – Scale, or by holding down the SHIFT key and dragging the diagonal arrows that appear at the corners of the image.
STEP 3

Regardless of whether you imported an image or not, create a new layer on top of the Map layer, grab a brush and start painting your landscape. It's better to make it a little larger than the image itself.
STEP 4

After completing the sketch, take the eraser and go over the outer edges of the sketch. They will be crooked and out of line, so you will need to go over these lines several times to clean everything up. If you want to make islands, make them now.
STEP 5

Click on the picture to view the image in full size and 100% quality.
Now you can take the quick selection tool and select everything that is outside of your land. After that, we start doing even more erasing; no continent or country is perfectly straight, round or angular. Let's add debris, depressions and cracks all over our map! =P Also, add some less-than-ideal-shaped rivers and lakes. Your people will surely need water to survive!
STEP 6

Click on the picture to view the image in full size and 100% quality.
Population! Open the Cities group, and make the Capitol...more precisely the Capital (capital mistakenly turned into capitol) and the Town visible. The capital is circled in red. You'll probably have more than one town/city/village/etc., and here's how to duplicate them: second-click on the Town layer and select Duplicate Layer from the list. , which will appear. The new city will appear on top of your original city. Remember this for the next step!
STEP 7

Open the Landscape group. You have a choice of more realistic and hand-drawn objects. To prevent the picture from looking ridiculous, use only one of these styles. You can place these objects wherever you want, and you can also duplicate (multiply) them. When you “plant” trees on your property, place mountains, rocks and forests, and consider the environment if you have not already done so. Civilization and vegetation, for example, tend to appear where there are sources of water. If you need to resize something, use the technique described in STEP 2.
STEP 8

Click on the picture to view the image in full size and 100% quality.
Open the Text group. It contains the following layers: River/Forest name, Town name, and Continent name. You can use a wider variety of fonts (eg Calibri for forest names, Juice for country names, etc.). The easiest way to make the font fit: create a duplicate original text, and change its font. Next, let's play with the effects. In this case, the outer glow and drop shadow look very good here. Don't forget to name all the worlds, continents, countries, regions, states, villages, settlements, cities, capitals, oceans, rivers, lakes, mountains and plains. You don't have to name every detail on the map, but it will be annoying.
And you're done! WOW! Well, at least unless you really want to make your card something one-of-a-kind. If you still want...
ACCESS TO A NEW LEVEL IS OPEN!!
Scroll down the page to see the most interesting, but completely optional effects that can be applied to the card.
SUPER-DRUPER EFFECTS
The following is optional, but it contains some information to help improve your map.
Card Paper

If you want more emphasis and texture on your card, you can change the background! First, create a new layer on top of the Map layer. Take a brush, select a white color, and get to work. Personally, I like scatter brushes for this, but you can use any other brushes, for example, with coins, ships, animals, plants, etc.
Pay attention to the screenshot below, where you can see the changes after brushing. If you are using a scatter brush (or any other brushes with unusual patterns), work it over the entire surface of the card so that there are no empty spots.
Add Brightness

Does your map seem not bright enough? Click Image – Adjustments and you will see the following options: Hue/Saturation, Brightness/Contrast and Curves, which are the best adjustment options for our map. Go ahead, experiment! Notice the difference between this screenshot and the one above. Thanks to the Brightness/Contrast correction.
Guide Arrows

Click on the picture to view the image in full size and 100% quality.
No decent map can do without a compass!
The layer with the Compass (compass) is placed under the group of layers Landscape (landscape). Place it in an area where there is no dry land, adjusting it to size if necessary. I also like to add all sorts of effects to the compass. Experiment! In the screenshot you can see my favorite settings (the words highlighted with a “marker” are the names of various effects).

Click on the picture to view the image in full size and 100% quality.
A watermark is protection from paranoids (me included). Watermarks can protect your work from theft. If you have your own signature - or even if you want to use your name, email, dA page address - you can add it. Create a new layer (normal or text). All you need to do is add a watermark to a new layer, adjust it to size and reduce the Opacity (Opacity) or leave it as you like. Speaking of watermarks and liking... this entire tutorial is watermarked... don't even think about stealing it!
Also, if you want to create paths and signs on the map to give it a taste of ADVENTURE, just add a new layer on top of the land layer, grab a brush, pick a color close to the color of the map, and paint! You can also use humorous brushes, like the sea dragon in my map.

Click on the picture to view the image in full size and 100% quality.
MAP IS READY!
Download font Booter Zero Five you can here: You cannot download files from our server
- Download with object layers
You can also watch this lesson in video format!
By studying geographical maps, you can mentally transport yourself to another area and dream about distant countries. They excite the spirit of romanticism and thirst for travel in us. But did you know that a geographic map can become an extravagant interior design element?
This bright detail will appeal to lovers of adventure and everything unusual, because it will give the room an atmosphere of adventurism, inspire warm thoughts about travel and distant countries, as well as tender memories of places visited.

Cards are a universal material. It is not necessary to give preference to new copies. Use old, worn, yellowed cards.

Edges aged by time will not only not spoil the overall perception of the decorated item, but will also add additional charm and a vintage effect. When choosing a map, pay attention not to how it was preserved, but to what is depicted on it.

The future decorative element should be harmoniously and naturally combined with the decor of the room. So you can choose different types cards – from political map world, to the map starry sky or the metro. In any case, everything will depend on your taste.

There are many options for using cards in the interior. We will be happy to share our ideas, and you can try to bring them to life.
Room decor using cards
The first and simplest example of decorating a room using cards is wall decoration. Absolutely any room is suitable for these purposes.

Mediterranean-style interiors are characterized by white walls. Add variety with a large world map. Use it to decorate one wall - it will add a bright accent without disturbing the overall style.


Decorating the ceiling and floor with cards is less common, but it is also very attractive. In the dining room or living room, linoleum or a carpet of the appropriate color looks unusual. And with the help of a vintage card you can design a socket for a chandelier on the ceiling.

Just don't use this technique for the whole room. If you decide to decorate the floor or ceiling with a geographical map, leave plain walls. This way you can avoid tacky design.
Furniture decor using cards
A very interesting effect is obtained if you decorate furniture using cards. The technique of decoupage has gained great popularity - decorating a surface by gluing an image onto it. Thanks to this, even the most unsightly furniture can find a second life. Try decorating an old chest of drawers this way. Highlight the drawers with card fragments and leave the frame plain.

A shabby coffee table will be transformed beyond recognition if you stick the entire map onto the entire tabletop. Additionally, outline the continents or countries visited using bright acrylic paints. Cards can also decorate kitchen cabinets. A chair covered from back to legs with satin pages looks very stylish and original.
If the budget allows, then in collections fashion designers you can find exclusive items. For example, upholstered furniture upholstered in fabric with a print in the form of a geographical map. Designers were even able to use globes, using them as chandeliers and table lamps.

Decorating interior items using cards
If your door has cells, stick separate fragments from the whole map into each of them. Looking at the canvas from afar, you will be able to see a single picture of the world. Geographic maps can appear in the interior in the form of prints on blinds.

Textiles depicting continents and countries are very popular. Select details depending on the chosen style: decorative sofa pillows, bed linen or window curtains.
Cards look amazing on lampshades and lamps. The soft light from the lamp gives the image volume. Be sure to follow fire safety rules - do not cover the frame of the lamp with paper fragments. It is best to apply them to factory lampshades, additionally coated with a fire-resistant compound.
If you inherited your grandmother's old chest, do not rush to throw it away. Decorate it with cards, additionally tint some areas and strengthen the abrasions. The result is a delightful drawer for laundry or children's toys.
Geographic maps for home decoration and more
Cards can be used to create unusual decorations for your home. With their help, you can make beautiful mats for photo frames. Make a set of boxes of different sizes, covering each with pieces from a large card.

From the old atlas you will get original envelopes for decorating invitations to celebrations.
Create an unusual panel by attaching butterflies cut from a geographical map under glass using pins. Using the decoupage technique, you can also decorate wooden interior figurines. A clock with an aged map dial will be a perfect addition to a colonial-style interior.
Practice your design skills on dishes, kitchen utensils or flower pots. For these purposes, you can purchase: ready-made cards, and print it on a printer interesting options. This is an excellent form of creativity for those who like to decorate their home with their own hands.

If you have a dressing room, diversify it with boxes for shoes or hats with geographic-themed designs.
If you don’t know how to decorate a gift in an original way, just wrap it in paper with a picture of a world map! This wrapper does not require additional decorations; just tie a bow from twine or a simple linen ribbon.

Almost any item is suitable for decorating with cards. Design folders for papers and cups for stationery in this way, and your child will be very pleased.
And although the idea of using geographical maps is not new, their presence in interior design makes it possible to transform a room.
The President Mobility company offers a bold solution for space design. Apply an image of a world map to one of the walls and see how original, stylish and effective the result will be. A world map in a nursery’s interior is a universal idea for a child’s room of any gender and age, capable of harmoniously fitting into the overall design concept from leo-gk.com.

 The world map in the interior of a nursery performs not only a decorative, but also an educational function. Looking at states and continents, the child gets acquainted with our planet, remembers the names of cities and countries, and comes up with fascinating stories about distant travels. On the world map you can mark places where you have already been, or places that you are just planning to visit.


Types of world maps in the interior of a nursery
To ensure that your child explores his planet with interest, create for him a bright, clear, large-scale composition that attracts attention and seems to invite him to far-off journeys.
There are several types of world maps in the interior:
- political with marked boundaries of regions and states, names of capitals and large settlements;
- physical, displaying the unevenness of the earth's surface;
- thematic, containing various information about the population, minerals, animals, plants, etc.


You can also use not only a modern, scientifically accurate image, but also a stylized ancient drawing, and even a fantasy abstract composition. An excellent alternative to a world map in the interior of a child’s room can be a map of the streets of your hometown or district. With its help, the child will learn about everything that is outside the house and learn to better navigate the surrounding space.
Options for the execution of world maps in the interior of a nursery
If you don't want to spend a lot of time decorating the space, use ready-made solutions. An excellent option is photo wallpaper, which can be used to cover one or more walls in a room. The main thing is that they are created using high-quality hypoallergenic paints that are safe for health.


Of course, you can always buy a ready-made geographical map of the world in a store. To prevent the room from becoming like a school office, purchase a set of bright buttons and markers with which the child can mark any places while playing and imagining.
The most original and spectacular cards worlds in the nursery interior are created with your own hands. Coping with the task is not as difficult as it might seem at first glance. It’s enough just to prepare several stencils in the shape of continents and stock up on brushes, paints, markers and patience. The outlines of countries and continents can even be formed from figures of animals living in a particular region, cutting them out of books and gluing them to wallpaper. Invite your child to take part in the design: what could be more fun than drawing on the wall!


Designer tips for decorating a world map in the interior
When choosing such an unusual decor, make sure that the rest of the space is not overloaded with unnecessary details. The color scheme of the image should be combined with the shades of furniture and textiles. A little trick: to make the room look more spacious, choose two-tone options made in pastel colors. The blank contours of the continents applied to a plain surface look impressive in the interior of a nursery. World map in the nursery interior - great gift for a child!


