How to open the geforce experience menu in the game. Nvidia Freestyle does not work and is not supported, how to enable it? If NVIDIA Freestyle does not work or does not turn on
With the release of technology on January 9, 2018 « Freestyle”, working on the basis of the “GeForce Experience” program, many users got their hands on an effective tool that allows them to change the dynamic picture in games to suit their preferences. This allowed such users to gain a number of competitive advantages over their rivals in games (for example, in the popular “CS:GO”, the use of “Freestyle” made it possible to brighten dark corners and disperse flash grenades). But not all users launch Nvidia Freestyle smoothly; for many, Freestyle does not start or works rather poorly. In this material, I will discuss how to enable “Nvidia Freestyle” and what to do in a situation where “Freestyle” does not work or is not supported.
Studying technology from Nvidia “Freestyle”What is "Nvidia Freestyle"?
- To use the technology, you must enable the “Experimental Features” option in your account settings on the Nvidia website.
- In your account on the website, click on the gear icon, and in the “About” section, select “Enable experimental features.”
- Then restart your GForce Experience.

Then, in the settings of this program, activate the “In-game overlay” option.

All you have to do is launch the desired game, press “Alt+F3” in the game (in some cases Alt+Z), and then make the necessary settings for the visual content.

Please note that not all games support Freestyle technology. A list of supported games can be viewed on the Nvidia website (Tom Clancy's Rainbow Six Siege, Counter-Strike: Global Offensive, Call of Duty: WWII, Counter-Strike: Source, etc.).
What to do if Nvidia Freestyle does not work
If you do not have support for Nvidia Freestyle, and nothing happens when you press Alt+F3 in the game, then I recommend doing the following:

The game does not support Nvidia Freestyle
If you wish, you can use this technology for games that do not officially support the Freestyle technology. To do this, you will need to use the Nvidia Profile Inspector program.
- Launch this program, in the “Profile” section select the game profile, among the options in “Other” find “Ansel flags for freestyle mode”.
- And set it to the value of the lowest point (with the number 4).
- Then click on “Apply changes” to save the result.

Conclusion
If “Nvidia Freestyle” does not start, then first of all check the hardware of your PC for compliance with the hardware requirements, as well as for the presence of the latest utility software from Nvidia in the system. If both the first and second are normal, then follow the tips listed above to solve the problem with launching “Freestyle”, which will allow you to use its functionality to get the game image you need.
Most games have graphics settings that can be used to change some basic image characteristics. For example, you can increase or decrease the brightness, turn motion blur on or off, etc. But, as a rule, the list of available options is very modest and you won’t be able to significantly change the graphics this way.
To solve this problem, you can use NVIDIA Freestyle. In this guide, we will tell you what NVIDIA Freestyle is, as well as how to enable and use it.
NVIDIA Freestyle is one of the new features in GeForce Experience. NVIDIA Freestyle, as well as a number of other GeForce Experience improvements, were presented at CES 2018 and became available to users in early 2018.
NVIDIA Freestyle provides the user with the ability to apply image post-processing filters to games. This does not require any intervention in the game files or restarting it. Everything happens right in the game using an in-game overlay, which is called by the ALT-Z key combination. This way you can change the color or saturation, as well as apply other post-processing filters to the image.
At launch, NVIDIA Freestyle has 15 filters available, each of which has dozens of different settings. For example, there are filters such as: black and white image, sepia, vignette, contrast, depth of field, retro, etc.
It should be noted that NVIDIA Freestyle only works on relatively new ones. A GTX 600 series graphics card or higher is required to use this feature. On laptops, Freestyle requires a GTX 660M or higher to run. Also, for the function to work, you need a fresh driver for the video card.
As for games, then NVIDIA Freestyle works with almost everything popular games. For example, you can use it in games from such series as: Assassin’s Creed, Battlefield, Call of Duty, Counter-Strike, Crysis, DiRT, Dishonored, Divinity: Original Sin, DOTA 2, F1, Fallout, Far Cry, FIFA, Football Manager, Grand Theft Auto V, GRID, Half-Life, Hitman, Just Cause, Metro, NBA, Need for Speed, Overwatch, Resident Evil, The Elder Scrolls, The Witcher.
How to enable NVIDIA Freestyle in game
To run NVIDIA Freestyle, you will need GeForce Experience. Therefore, if you do not have it installed yet, then go. The first time you launch GeForce Experience, you will need to create an account or sign in using your Google or Facebook account.

After launching GeForce Experience, you need to click on the button with the gear icon in order to go to the program settings.

In the settings you need to scroll down the page to the list of functions. There you can find the NVIDIA Freestyle feature. If it is available on your computer, then there should be an inscription “Ready” next to it. There will also be links to system requirements and a list of supported games.

If Freestyle is supported, then you can use this feature in games. To do this, launch the game and press the key combination ALT-Z. After this, a menu will appear at the top of the screen in which you need to select “Filter".

Now you can configure appearance games. To do this, select one of the styles in the upper left corner, add a filter and configure its settings. When everything is ready, you can save the settings by clicking on the “Finish” or “Done” button.

In order to turn off filters and return to the original view of the game, you need to open the NVIDIA Freestyle menu again and click on the “Off” or “Off” button.
17.06.2019
Problems with autorun
Reason 1: Removing a task from startup
There are two ways out here. The first is to try to check the startup data. For example, in CCleaner.


Reason 2: Virus activity
Read more: Cleaning your computer from viruses
Reason 3: Lack of RAM

Problems with calling
Reason 1: Process failure


Reason 2: Registry problems
-
Read more: Cleaning the registry with CCleaner
Reason 3: Program failure
Conclusion
Not reallyGeForce Experience won't launch - what should I do?
For several years now, video card manufacturers have been supplying their devices with special programs that allow them to optimize their operation as much as possible. For example, for nVidia video cards this is GeForce Experience, and if you have this application installed, then you should definitely explore its capabilities. You will be able to configure the operation of your video card with maximum flexibility, as well as optimize the computer games you play using special functions. However, all this will not be available to you if GeForce Experience does not start - unfortunately, many users face this problem. Therefore, it is worth looking at how this issue can be resolved without using the help of technical support.
The essence of the problem

If we talk about GeForce Experience not starting, there may be several options. For some users, the program does not want to turn on at all, while for others it crashes upon startup. Someone can use it before certain point or actions, after which the error still appears. In general, quite a lot of different cases have been recorded that lead to unpleasant consequences - even turning off the video card. Accordingly, you need to be able to cope with emerging problems in emergency conditions. You should not improvise, it is better to read the instructions and act in accordance with the recommendations - then you will have a chance to cope with the problem without outside help. So, if GeForce Experience won't launch, what should you do first?
Antivirus check

Naturally, you can run an antivirus to check your computer for malware that is blocking it from starting. However, in most cases this does not work. And in this situation, we are talking about an antivirus not because of virus checking, but because it may be the reason why GeForce Experience does not start for you. The fact is that many antiviruses indiscriminately add various applications to the list of potentially dangerous ones, thereby blocking their launch on the computer. To check if your video card program is on this list, you will need to go to the settings of your antivirus. If it gets there, you will need to manually remove it from there, and then add it to the list of exceptions so that the antivirus will no longer perform similar actions in relation to this software. But this may not always be the problem, so you need to know what to do when Nvidia GeForce Experience does not start for some other reason.
Problems with new drivers

From time to time you may have problems downloading new drivers for your video card. And then you may definitely have questions about why GeForce Experience does not start, because every person who downloaded the update wants to see improved operation of the device, and not what is happening in this case. But anything can happen: your software center may stop starting, it may turn off altogether, and sometimes even your video card turns off. Then you need to manually kill this process, kill all its “tails,” and then again manually launch it through Windows services. The whole point here is that sometimes the drivers come out not very smooth, and before the developers notice it, many people are already downloading them, installing them and getting a headache. Therefore, use fixes that knowledgeable people make and post on public resources so that people can wait for the official patch from the developers. Therefore, if your GeForce Experience takes a long time to start after installing a driver update, you better immediately think about the fact that the consequences may not be the most pleasant.
Drivers tab

GeForce Experience has quite a few tabs, each containing useful information, as well as rich customization options. However, in some cases (especially after installing less-than-smooth drivers), one of them can cause you a lot of problems. The fact is that without an official patch, the "Drivers" tab becomes a restricted area. Even if you completely fix your graphics card-related software and it starts again, you only need to go to the driver update tab once and GeForce Experience will stop working again. Therefore, avoid it, and if possible, write in the config so that the program automatically opens on any other tab, for example with games.
English language
Another way to solve the problem, which works for many, but absolutely no one understands why it works, is changing the language. If you change the language to English (for the US region) in the GeForce Experience program itself, the problem may disappear by itself. As already said, this solution has no logical explanation, but it works in many cases, so you should just take the opportunity to fix everything without unnecessary problems. So don't think about why everything works - it's better to take the chance when it presents itself.
GeForce Experience won't install

There is no need to talk about the advantages of the operator's digital entertainment capabilities NVIDIA GeForce Experience. It is better to instead pay attention to the problem when this program is not installed on the computer at all under various pretexts. There is no point in abandoning GF Experience in such a situation; the problem needs to be solved.
About GF Experience
GF Experience comes with drivers for NVIDIA video cards completely free of charge. As a result, installing this program separately from the drivers is only possible when downloading from third-party resources. The official NVIDIA website does not supply this software separately. Considering that the program is free, you should not try to download it from anywhere. This may harm your computer and also prevent further attempts to install a licensed GF Experience.
If it is impossible to install the version of the program downloaded from the official website, then this should be dealt with in more detail. In total, besides individual ones, there are 5 different reasons.
Reason 1: Installation not confirmed
The most common situation is an incorrect installation of the driver software package. The fact is that GF Experience comes as an additional component to the drivers. By default, the program is always added, but there may be exceptions. So it is worth checking whether the presence of this program is confirmed during installation.

As a rule, after this the program is successfully added to the computer and starts working.
Reason 2: Not enough space
A standard problem that may interfere with the installation of any other programs. The fact is that NVIDIA is quite demanding on memory - first the update package itself is downloaded, then it is unpacked (taking up even more space), and then the installation begins. In this case, the installer does not remove the unpacked materials behind him. As a result, a situation may well arise that there is simply nowhere to install GeForce Experience.
The main thing is to remove the unpacked NVIDIA files for the installer. As a rule, they are located immediately on the root disk. This is necessary because the NVIDIA driver installer does not clean up the workspace, so this folder may contain files for previous drivers.

Then you need to clear up space on the main drive. This can be done manually by deleting unnecessary programs, files, and data from “Downloads”. You can also use specialized programs.
Read more: Clean up free space with CCleaner
After this, you should try to reinstall the drivers. It will be best if by this moment there is at least 2 GB of free space on the disk.
Reason 3: GF Experience is already installed
It may also turn out that the new GF Experience refuses to install because another version of this program is already installed. The user may not be aware of this if the software does not work. This is especially common when Experience does not start with the system, and there is no shortcut to the running program in the notification area.
In such a situation, you need to figure out why GeForce Experience refuses to function correctly. You can find out more about this in a separate article.
Read more: GeForce Experience won't turn on
Reason 4: Registry crash
From time to time situations occur when, when removing or replacing old version GeForce Experience entry in the registry about the presence of the program is not erased. Therefore, the system continues to think that there is no need to install anything new, because the product is already installed and working. The double problem here is that usually when installing NVIDIA drivers, the process forces all components to update. So a significant portion of cases where a registry entry is not deleted go unnoticed.
However, there are also really serious problems when this entry is also not accompanied by product version information. Therefore, during installation, the system cannot determine whether the program needs to be replaced or not, automatically leaning towards the second option. Therefore the user cannot install anything.
The problem is solved in two ways.
The first is to try a clean reinstall.
Now all that remains is to complete the installation. Usually after this the program is added to the computer without problems.
The second option is to clear the registry of errors.
CCleaner is quite suitable, as it can perform this procedure quite effectively.
Read more: How to clean the registry using CCleaner
Once the cleanup is complete, you should try installing the drivers again with GeForce Experience.
Reason 5: Virus activity
There are known cases where various malware directly or indirectly interfered with the performance of GeForce Experience. You should scan your computer, destroying any viruses if found.
Read more: Check your computer for viruses
After this, you should try the installation again. Usually everything works correctly.
Conclusion
As you can see, the problem with installing GeForce Experience is resolved quite quickly and mostly without problems. There may be other reasons for the system to refuse to install this software, but in most cases these are individual problems. And they require specific diagnostics. The above is a list of the most common problems.
Not reallyNVIDIA GeForce Experience does not update drivers

A program such as NVIDIA GeForce Experience is always a faithful companion for owners of the appropriate video cards. However, it can be a little annoying when you suddenly have to face the fact that the software does not want to perform one of its most important functions - updating drivers. We'll have to figure out what to do about it and how to get the program back to work.
Driver Update
GeForce Experience is a wide range of tools for servicing the interaction between a branded video card and computer games. The main function is to track the appearance of new drivers for the board, download and install them. All other features are peripheral.
Thus, if the system ceases to fulfill its main responsibility, then a comprehensive study of the problem should begin. Since the functions of recording game progress, optimizing for computer parameters, etc. very often they also stop working, or their meaning is lost. For example, why require a program to configure the parameters of a new action movie for your computer if the main slowdowns and performance drops can only be corrected by patching the video card.
The problem can have many origins; it’s worth understanding the most common ones.
Reason 1: Outdated version of the program
The most common reason why GF Exp refuses to update drivers is that the program itself is out of date. Most often, updates to the software itself come down to optimizing the process of downloading and installing drivers, so without timely upgrades the system simply will not be able to perform its function.
Typically, the program automatically updates itself upon startup. Unfortunately, in some cases this may not happen. In such a situation, you need to try restarting the computer. If this does not help, you should do everything manually.

After installation is complete, you should try running the program again. It should work properly.
Reason 2: Installation process failed
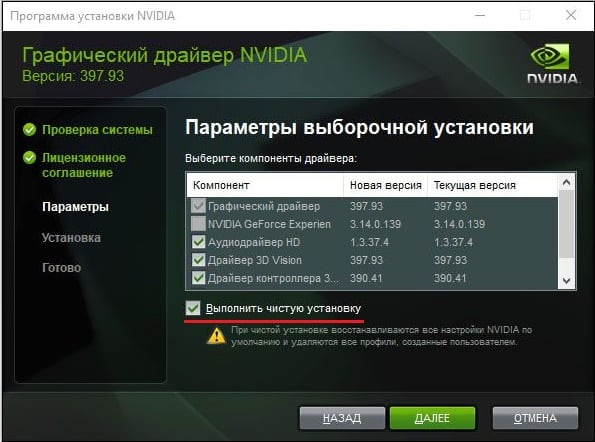
Problems can also occur when, during the driver update process, the system crashes for one reason or another. The installation was not completed properly, some were installed, some were not. If the user did not first select the “Clean Install” option, then the system usually rolls back to a previous working state and no problem is created.
If the option was selected, the system initially removes old drivers that it plans to update. In this case, the system has to use the damaged installed software. Usually in such a situation, one of the first parameters is to set signatures stating that the software is on the computer. As a result, the system does not diagnose that drivers need to be updated or replaced, believing that everything added is up-to-date.

As a rule, installation on a cleaned computer does not cause problems.
Reason 3: Driver failure
The problem is similar to the one mentioned above. Only in this case does the driver fail during operation under the influence of any factors. In this case, there may be a problem reading the version signature and GE Experience may not be able to update the system.
The solution is the same - remove everything, and then reinstall the driver along with all the associated software.
Reason 4: Problems with the official website
It may also be that the NVIDIA website is currently down. Most often this happens during technical work. Of course, drivers cannot be downloaded from here either.
There is only one way out in this situation - you need to wait until the site starts working again. It rarely fails for a long time; usually you need to wait no more than an hour.
Reason 5: User technical problems
Last but not least, it is worth considering a certain range of problems that come from the user’s computer, and this prevents the drivers from being properly updated.
- Virus activity
Some viruses can make malicious adjustments to the registry, which in their own way can affect the recognition of the driver version. As a result, the system cannot determine the relevance of the installed software and does not update.
Solution: cure your computer for viruses, reboot it, then log into GeForce Experience and check the drivers. If nothing works, you should reinstall the software, as shown above.
- Insufficient memory
During the update process, the system requires a lot of space, which is first used to download drivers to the computer, and then to unpack and install the files. If the system disk on which the installation is taking place is full, then the system will not be able to do anything.
Solution: Clear up as much disk space as possible by deleting unnecessary programs and files.
Read more: Cleaning memory using CCleaner
- Outdated video card
Some older versions of NVIDIA video cards may lose support, and therefore the drivers simply stop being released.
Solution: either come to terms with this fact, or buy a new video card of the current model. The second option is, of course, preferable.
Conclusion
In the end, it’s worth saying that updating your video card drivers in a timely manner is very important. Even if the user does not devote too much time to computer games, developers still often put new patch although small, but in their own way important elements for optimizing the operation of the device. So the computer almost always starts working, perhaps imperceptibly, but still better.
We are glad that we were able to help you solve the problem.
Poll: did this article help you?
Not reallySolving the problem "GeForce Experience refuses to optimize games"

Optimizing computer games is one of the main functions of NVIDIA GeForce Experience, which is highly valued by owners of not the most powerful computers. And therefore, if this program ceases to fulfill its duties, refusing under various pretexts, this causes trouble. In this case, some users simply prefer to independently change the graphics settings of a particular game. But this does not mean that everyone likes this approach. So you need to figure out why GF Experience refuses to work as intended, and what to do about it.
The essence of the procedure
Contrary to popular belief, GF Experience does not magically find games everywhere and instantly gain access to possible settings. The understanding of this fact should already be prompted by the fact that the program demonstrates each moment of the graphics parameters on a special screenshot - it would be too much to automatically select them challenging task for regular software 150 MB in size.

In fact, game developers independently prepare and provide NVIDIA with data on settings and possible optimization paths. Therefore, all the program needs is to determine what kind of game it comes across in each case and what can be done with it. NVIDIA GeForce Experience obtains game data based on information from the corresponding signatures in the system registry. Understanding the essence of this process should be the starting point when searching for a possible reason for failure in optimization.
Reason 1: Unlicensed game
This reason for optimization failure is the most common. The fact is that in the process of hacking the game’s built-in security, pirates often change various aspects of the program’s operation. Especially often in Lately this concerns the creation of entries in the system registry. As a result, incorrectly created entries can cause GeForce Experience to either incorrectly recognize games or be unable to find the settings and optimization parameters associated with them.

There is only one recipe for solving the problem here - take a different version of the game. Specifically for pirated projects, this means installing a repack from another creator. But this is not as reliable a method as using licensed version games. Trying to rummage through the registry in order to create correct signatures is not very effective, since this can also lead, at best, to incorrect perception of the program by GeForce Experience, and at worst, by the system as a whole.
Reason 2: Unregulated product
- Firstly, the game may not initially have the appropriate certificates and signatures. This primarily applies to indie projects. Developers of such games care little about cooperation with various hardware manufacturers. NVIDIA programmers also do not disassemble games themselves in search of ways to optimize. So the game may simply not fall into the program’s attention zone.
- Secondly, the project may not have knowledge of how to interact with the settings. It's not uncommon for developers to create certain games so that Experience can recognize them based on their registry entries. However, there may be no information on how to calculate the potential configuration of settings depending on the characteristics of a particular computer. Without knowing how to adapt the product to the device, GeForce Experience will not do this. Most often, such games may be on the lists, but do not demonstrate any graphics parameters.
- Thirdly, the game may not provide access to change settings. Thus, in NVIDIA GF Experience you can only familiarize yourself with them, but not change them. This is usually done in order to protect the game from third-party interference (primarily from crackers and distributors pirated versions), and often programmers prefer not to make a separate “pass” for GeForce Experience. This requires extra time and resources, and also adds extra exploits for hackers. So you can often find games with a full list of graphics parameters, but the program refuses to attempt to configure them.
- Fourthly, the game may not have graphics settings at all. Most often this applies to indie projects that have a specific visual design - for example, pixel graphics.
In all these cases, the user is unable to do anything, and settings must be made manually if possible.
Reason 3: Registry entry problems
This problem can be diagnosed in the case when the program refuses to configure the game, which must be susceptible to such a procedure. As a rule, these are modern, expensive projects with a big name. Such products always cooperate with NVIDIA and provide all the data to develop optimization techniques. And if suddenly similar game refused to optimize, then it’s worth looking into individually.

Conclusion
As you can see, most often the problem with GeForce Experience failure lies in the fact that the game is either unlicensed or is not included in the NVIDIA database. Registry breakdowns are quite rare, but even in such cases they can be fixed fairly quickly.
We are glad that we were able to help you solve the problem.
You never know in advance when this or that program will refuse to work. The same goes for NVIDIA GeForce Experience. The failure of this digital entertainment operator is observed quite often. Fortunately, in most cases, any problems can be resolved without much difficulty.
First, it’s worth considering the reasons why the system refuses to run the program in passive mode, as it should do under normal conditions. Typically, the system forcibly adds a process to startup every time the computer starts. If this does not happen, then you should look into it.
Reason 1: Removing a task from startup
The first thing worth checking is the mechanism for automatically adding the GeForce Experience launch process in startup that has gone wrong. The problem is that this process has a specific protection system, so most programs that work with startups do not see GeForce Experience. And, as a result, they often cannot turn it on or off.
There are two ways out here. The first is to try to check the startup data. For example, in.


If the process does not appear, then a complete reinstallation of this software can help.


After this, you can begin the installation. The system will completely update both the software and registry entries. This usually helps remind Windows that it should run GF Experience every time it starts.
Reason 2: Virus activity
Some malware can block GF Experience autorun either indirectly or intentionally. So it’s worth checking your computer for viruses, and getting rid of them if found.
After this you need to restart your computer. If something really interfered with the startup of the program, and it was removed, then there should be no problems now.
Reason 3: Lack of RAM
Also, the system may simply be too overloaded right from the start to launch GF Experience as well. In such a situation, failures to start other processes can be diagnosed. By the way, this problem is most often observed on devices where many other processes are listed in startup.
There is only one solution - optimization.

Now everything should work much better and GeForce Experience should not be preventing anything from turning on automatically.
Problems with calling
Also, many users are faced with the fact that they cannot open the GeForce Experience window itself to work with drivers and other important functions of the program. In this case, certain factors may interfere.
Reason 1: Process failure
This is the most common problem. The system has encountered a failure in the background task that ensures the functionality of the program.
In most cases, there is only one solution - restart the computer. Usually after this the program starts working as it should.
It is worth adding that there are cases when a process failure leads to the fact that the program does not start from the shortcut from the notification panel. In this case, when the user chooses to open the NVIDIA GeForce Experience panel, simply nothing happens.

In such a situation, it is worth trying to directly launch the program from the folder where it is installed. By default on Windows 10 its address is here:
C:\Program Files (x86)\NVIDIA Corporation\NVIDIA GeForce Experience
Here you should open the NVIDIA GeForce Experience application file.

If the error really was in launching from the notification panel, everything should work.
Reason 2: Registry problems
It is also often reported that registry entries about the operation of the program may fail. The system recognizes GF Experience as a correctly executed task, when it may not be, and indeed the program may even be absent.
- In such a system, the first thing you should do is check your computer for viruses. Some malware can cause problems like this.
- Next, you should try to repair the registry. For example, you can use the same CCleaner.
- This step can especially help if the program is really damaged to such an extent that it cannot work on the computer, but is listed in the registry as one of the executable tasks.
Reason 3: Program failure
A banal failure of certain components important for the operation of GeForce Experience. If none of the above helps, then in most cases this means exactly this problem.
Only a complete clean reinstallation of the software can help here.
Resolving the “Something went wrong...” error
One of the common situations that users encounter is an error with vague content: "Something went wrong. Try restarting GeForce Experience." or similar text in English: "Something went wrong." Try restarting GeForce Experience.".

To fix it, you will need to work with Windows services:

Conclusion
As we can conclude, the failure of GeForce Experience almost always means certain problems in operation operating system, so you can never ignore this moment. A complete examination, cleaning and optimization of the computer should be carried out. We must not forget that this program is primarily responsible for the performance and maintenance of such an important component as a video card, so you should treat this with the utmost care.
When launching the popular program “GeForce Experience”, we may encounter the message “Something went wrong. Try restarting GeForce Experience." Many Windows users have encountered this error throughout the years. recent years, but the factors causing the problem may vary on each PC. Below we will analyze the most common causes of the problem, and also outline options for solving it.
GFE malfunction
The “Something went wrong, please restart GeForce Experience” error usually occurs when the user’s PC is unable to launch GeForce Experience correctly. The error began to be recorded en masse with the release of GeForce Experience 3.0, which contained a new option and improved performance, and was not without various bugs and errors.
The error in question usually occurs due to the following reasons:
- The GFE application is not configured correctly by the user;
- The program body is damaged;
- Nvidia services (in particular, “Nvidia Display Container” or “Nvidia Telemetry Container”) are either not running at all or are not working properly;
- The system has outdated drivers for the graphics card;
- Correct operation of GFE is blocked by antivirus;
- Not installed on the system Latest updates for Windows OS.
In some cases, the problem may also be caused by an unstable network connection, due to which GFE may not work correctly.
let's consider effective ways, allowing you to get rid of the “Something went wrong” error on your PC.
Stop all GFE processes and restart the application
The first step when eliminating “Something went wrong. Try restarting GeForce Experience" try to launch GFE correctly.

Configure Nvidia services
- Click on Win+R, type services.msc there and press enter.
- In the list of services, find “Nvidia Telemetry Container”, hover over it, right-click, select “Properties”.
- In the service properties window that opens, select the “Login to the system” tab, activate the option “With system account", then click on "Apply".
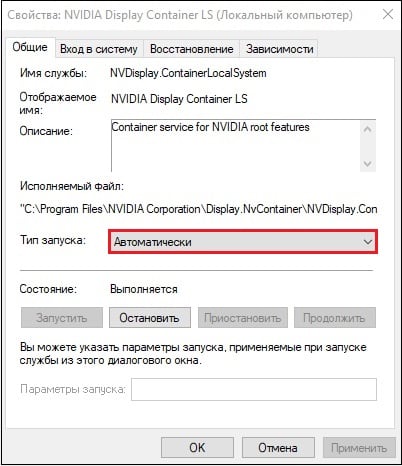
- Now go back to the list of services, find the “Nvidia Display Container” service, right-click on it, select “Properties”.
- Go to the "General" tab, and set the startup type to "Automatic".
- Click on "Ok" and restart your PC.
Update existing Nvidia drivers
Also try updating the drivers for your Nvidia video card. To do this, you must first completely uninstall the existing drivers (the popular DDU program will help), and then install the drivers from the Nvidia website.
Helped some users fix the error “Something is wrong. Try restarting GeForce Experience" method of removing all graphics drivers using DDU, rebooting the PC, and then installing GFE. Then you will need to let the program itself update the graphics drivers.
Programs such as DriverPack Solution will also help install drivers, scanning the system and installing fresh drivers for the system components of your PC.
Reinstall GFE
Completely remove the GFE program from your system (tools like Your Installer will help). Then install new version program, during installation, select advanced installation, and activate the “Clean Installation” option when installing drivers.
Install updates for your system
In some cases, the lack of recent system updates for your Windows does not allow GFE to work correctly. Click on the “Start” button, select “Settings” from the list of options, then “Update and Security”, and click on the “Check for updates” button. After installing the latest updates, try starting your GFE.

Check the user directory name
Make sure that the name of the user directory located along the path C:\Users\User Directory(the latter will be called differently) there are no Cyrillic or numeric characters. If there are any, it is recommended to rename the specified user directory, restart all Nvidia services, and check the functionality of GFE.
Conclusion
The error “Something went wrong. Try restarting GeForce Experience" usually indicates that there are problems with Nvidia drivers on your system. I recommend following the tips suggested above (paying special attention to working with services), which will allow you to resolve the “Something went wrong” error on your PC.
In contact with
If the in-game overlay in GeForce Experience does not turn on on your computer, then you should not rush and install alternative software. You can try to solve the problem yourself, especially since it is not so difficult to do. Today we will tell you what this ShadowPlay function is and what you need to do if this function does not work.
What is an In-Game Overlay?
The in-game GeForce Experience overlay is a special feature that is used to record video, stream broadcasts of what is happening on the computer, take screenshots and video recordings from the Desktop. This solution is characterized by minimal consumption of computer resources, which is especially useful when recording game progress. This technology is also called ShadowPlay or Share overlay.
Video capture option – ShadowPlay
- More and more experienced gamers are using this technology. GeForce Experience also recently introduced a new experimental feature - .
What should I do if the overlay does not turn on?
First of all, you need to determine whether the function is missing initially or whether it disappeared during the process. Where should I start? Of course, with standard procedures.

If ShadowPlay didn't work initially

If these steps do not help you, then there is a possibility that your installed GeForce Experience has problems. Download the previous version or wait for the new update to be released. As a last resort, you can try the beta version of the program.
GeForce Experience in-game overlay no longer turns on
This can be caused by various problems and bugs. If standard actions do not help, then you should try rolling back the video driver to the previous version. If this is impossible, just remove the driver and try to start the game. You can also try a clean installation of earlier drivers. In addition, installing a previous version of GeForce Experience will help.
Function ShadowPlay Highlights has certain compatibility issues with OS Win 7/8. This feature is used in games to record significant events. The developers are already aware of the problem and will fix it in the near future.
In the meantime, each game has its own solutions. In particular, for PUBG you can use the GfeSDK file located at the link: international.download.nvidia.com/GfeSDK.dll. It needs to be placed in the folder: PUBG\TslGame\Binaries\ThirdParty\NVIDIAGfeSDK\Win64, agreeing to a replacement.
Another life hack from folk artists, suitable in cases where it is impossible to call the ShadowPlay option:

Unfortunately, you will have to repeat this procedure after restarting the system.
Conclusion
As you can see, there are many ways to solve the problem. It is likely that the problem will be resolved with the next driver update. If, after doing everything possible, the in-game GeForce Experience overlay still does not turn on, we recommend contacting NVIDIA support.
Nvidia Control Panel, or otherwise Nvidia Update, is universal software that allows users of personal computers with an installed Nvidia video card to manage it, allocate resources in the optimal way, etc. This software works great on GeForce and ION GPUs for both PCs and laptops. If this software is not installed on your computer, you can easily download it from the official Nvidia website. In the control panel, the user will be able to independently set the necessary settings. For example, start or disable Nvidia Update, set the frequency of checks for updates. You can enable or disable notifications about beta driver releases for Nvidia video cards, and in addition, you can even edit game profiles.
Launching Nvidia Control Panel
Unfortunately, some users, even those who have the Nvidia control panel installed, cannot find it, and therefore cannot properly adjust the video card settings. There are two quite simple ways to open this control panel. The first method is for the user to simply click right click mouse on an empty space on the desktop, and in the context menu that appears, select “Nvidia Control Panel”. The second method is no less simple than the first. To do this, right-click on the system tray image (arrow in the lower right corner of the screen). After clicking, all logos of programs running in the tray will open. To launch the Nvidia Control Panel, you need to click on the corresponding icon (Nvidia logo).
Problems with Nvidia Control Panel
Some may encounter one significant problem - the driver control panel does not open. There are several solutions to this problem. Firstly, if you have programs installed on your computer that allow you to directly control the monitor, then you need to remove them. They directly block the operation of the Nvidia control panel and it cannot be used. Secondly, the control panel may not open if hardware acceleration is disabled on the computer. It can be enabled in screen properties. And lastly, the driver control panel may not launch if the Nvidia Display Driver Service is disabled. In order to enable it, you need to go to the “Control Panel”, select “Administration” and find the “Services” field. If this service is disabled, then you need to enable it to start automatically.
(he fell out of favor with the new anti-cheat), apparently, the contrast in the game can no longer be changed, visibility cannot be increased... No! Down with decadent thoughts! The Nvidia Freestyle settings in PUBG will allow you to improve clarity and generally make the picture much nicer. We will also deal with problems if the program does not turn on or writes that the game is “not supported.”
First you need to install them - they must be at least version 390.65, otherwise you won’t be able to launch Freestyle.
Next, download GeForce Experience - this is the utility that will allow us to work on graphics. The link will take you to the official website where you can get the latest version.
After installing these programs, launch GeForce Experience. Please note that you will have to register an account (you can use a Google account). But this utility will monitor the release of new drivers and notify you as they are released.
Now let's see how to enable Nvidia Freestyle:
- Immediately go to the settings by clicking on the gear;
- In the window that appears, you need to enable experimental features;
- Just below there is the “In-Game Overlay” function. Activate it;
- After that, go into the game and open the Freestyle window with the key combination “Alt+Z” and open the “Filter” window, or immediately press “Alt+F3” to go to it;
- Start adjusting the game parameters.
Filters
Now let's figure out how to set up PUBG filters with Nvidia Freestyle and what should be changed in order to be able to see your adversaries from afar.
Also study our guide, where there are - they will help you make sure that you notice enemies hundreds of meters away without any problems. And then your skill and luck will come into play.
I won’t describe what each of the parameters does - it’s pointless, since it’s easier for you to twist each slider and see the result with your own eyes. I’ll say right away that the utility offers a lot of useless things, some of which simply spoil the picture (like, for example, “Retro”), while others do not change anything at all.
Without having to dig too much, I suggest you take a look at ready-made options. Just remember that they are not a panacea. Don't be afraid to experiment and change the settings to your liking to achieve satisfactory results. Also remember that it is better to keep a separate filter for Miramar, and a separate one for Erangel. The fact is that the color scheme of both cards is very different and there is no universal option for them. Again, take ready-made values, and then adjust and look for the most acceptable ones for you.
To thoroughly study this Reshade replacement for PUBG using an example, we will use this screenshot:

First preset - improved color and clarity

As you can see, the picture here is more colorful: the world around us has sparkled with colors, become more attractive and warm. This will make things moving in the distance (yes, I mean people you want to shoot) easier to see.
- Saturation is responsible for the “richness” of the picture, for more colorful colors. Bet eighty percent;
- Changes in color - five percent is enough.
Detail:
- Sharpness - 25%;
- Sharpness - Helps make the edges of objects appear clearer. This will give you a better view of enemies running in the distance. Not less than fifty percent;
- HDR toning - 75%;
- Blur to zero.

The second preset is a clear boundary

This option is a bit of a cheat - it makes the boundaries of objects clearer. That is, the silhouettes of your enemies will be outlined with a black line. This especially helps to notice a figure flickering in the distance. The color scheme is a little depressing, but you can correct it by playing with the settings yourself: no one forbids you to change everything to your liking.
For those who don't like the tint reminiscent of Iraq War films, I recommend the "Color" tab. The previous preset showed that with its help you can greatly change the gamma of the game. Practice is the key to success.

The third is a blue tint

This option will make the tone of the picture colder. To change this, just twist the “Temperature” slider. Clarity is greatly improved thanks to the Detail section. Of course, the effect from this preset is much less than from the first two, but it is much better than the original.

Doesn't turn on or work
Not everyone's setup will go smoothly. Some of you may have problems on your way to perfect gameplay. Let's see what can be solved - and how.
Here is a list of common problems:
- Unable to enable "Experimental features": the program endlessly searches for updates.
- Nvidia Freestyle writes that PUBG is not supported - something similar can happen in CS:GO and Team Fortress 2 - exactly in those projects where the utility should work.
The root of all these troubles is conflict different versions drivers and GeForce Expirience.
If the in-game overlay in GeForce Experience does not turn on on your computer, then you should not rush and install alternative software. You can try to solve the problem yourself, especially since it is not so difficult to do. Today we will tell you what this ShadowPlay function is and what you need to do if this function does not work.
What is an In-Game Overlay?
The in-game GeForce Experience overlay is a special feature that is used to record video, stream broadcasts of what is happening on the computer, take screenshots and video recordings from the Desktop. This solution is characterized by minimal consumption of computer resources, which is especially useful when recording game progress. This technology is also called ShadowPlay or Share overlay.
Video capture option – ShadowPlay
- More and more experienced gamers are using this technology. GeForce Experience also recently introduced a new experimental feature - .
What should I do if the overlay does not turn on?
First of all, you need to determine whether the function is missing initially or whether it disappeared during the process. Where should I start? Of course, with standard procedures.

If ShadowPlay didn't work initially
If these steps do not help you, then there is a possibility that your installed GeForce Experience has problems. Download the previous version or wait for the new update to be released. As a last resort, you can try the beta version of the program.
GeForce Experience in-game overlay no longer turns on
This can be caused by various problems and bugs. If standard actions do not help, then you should try rolling back the video driver to the previous version. If this is impossible, just remove the driver and try to start the game. You can also try a clean installation of earlier drivers. In addition, installing a previous version of GeForce Experience will help.
Function ShadowPlay Highlights has certain compatibility issues with OS Win 7/8. This feature is used in games to record significant events. The developers are already aware of the problem and will fix it in the near future.
In the meantime, each game has its own solutions. In particular, for PUBG you can use the GfeSDK file located at the link: international.download.nvidia.com/GfeSDK.dll. It needs to be placed in the folder: PUBG\TslGame\Binaries\ThirdParty\NVIDIAGfeSDK\Win64, agreeing to a replacement.
Another life hack from folk artists, suitable in cases where it is impossible to call the ShadowPlay option:

Unfortunately, you will have to repeat this procedure after restarting the system.
Conclusion
As you can see, there are many ways to solve the problem. It is likely that the problem will be resolved with the next driver update. If, after doing everything possible, the in-game GeForce Experience overlay still does not turn on, we recommend contacting NVIDIA support.