How to make a ring from a coin at home. How to make a ring from a coin
Do you want to give your girlfriend a gift, but don’t have enough money? It’s okay, because you can make a very beautiful decoration from regular coin, using the simplest tools that everyone has at home - a drill and a tablespoon. True, the process is lengthy; it is advisable to choose a coin from a softer alloy.
It is better not to take coins containing nickel and copper, because they can cause allergies. Silver is best.
There are different instructions on the Internet. There are several ways, the simplest is to tap on the edge (edge of the coin), gradually turning it.
Usually a hammer is used for such forging, but American craftsman Shane Walton says that it turns out more accurately if instead of a hammer you hit the edge... with a tablespoon: he published step-by-step instructions on how to do this.
Manufacturing time: from 6 to 50 hours.
The first step is to drill a small hole in the center of the coin and insert a wedge there, with which we will hold the coin during forging.

Then we tap the entire edge with a spoon for several hours, turning the coin. The duration of the procedure depends on the softness of the metal. The ring gradually becomes thicker and smaller in diameter. We continue to forge until it reaches the desired size.

At this stage it is convenient to sand the outside of the ring by placing it on the drill bit. We use sandpaper, rotating the ring on the drill.
After this, all that remains is to remove the material from the center of the coin in any possible way: using a drill, grinder, file or other tools.

All the tools used in the process were photographed by Shane Walton. The ax blade was used as a kneeling support during the forging process. To polish the product, he took a woman's nail file.

Some steps and little tricks in the manufacturing process are shown in from another craftsman who tried to film the process.
Well, for more professional products that preserve the design of the original coin, you will have to use more technically sophisticated way.
A ring made by yourself looks no worse than a piece of jewelry from a jewelry store, and for a girl such a gift will be even nicer, considering how much time you spent on it.


Today I want to conduct a master class on making a ring from a coin.
I myself only recently learned to do this by watching videos and reading foreign authors.
Since I live in Israel, for example, let’s take an Israeli coin with a face value of 10 agorot - a tenth of a shekel.

Before we start working with the coin, we must heat it up to red, this process will release the metal and it will be much easier to work with the coin. There is one important point - you must not overdo it with heating, as the coin may become deformed and not all elements will be clearly visible on it.
When our coin has already turned red and whitened a little, you can stop the heating process and sharply lower the coin into cold water. She'll be so scary, but don't be afraid. 
That's it, the first stage is completed, now we move on to the second stage
At the second stage we must make a hole exactly in the middle of the coin, this is very important because the ring may come out uneven. Also, an important aspect is the size of the hole in the coin; if it is large, the final product (ring) will turn out to be very thin and may simply burst during further actions.
To punch holes, I use this custom-made device, but many have their own systems - a drill or a cutter disk, whichever is more convenient for you. 


The next step is to take the bolt (my bolt is slightly modified from above, as you can see, for my own needs (hahaha), put our holey coin on it.
Now we take a plastic hammer, it is very important to take just such a hammer, if you use a metal one, then the elements of the coin will, as you understand, be destroyed and the ring will not have the effect.
Now, with even blows of the hammer, we begin to pull the ring down, very carefully, do not apply strong blows so as not to deform the ring. 
We bring this whole thing to the dimensions we need, there is a marking on the crossbar and accordingly stop tightening the ring. One more small nuance, the ring needs to be removed and turned over from time to time so that it does not turn out to be such a strongly cone-shaped shape.


Our ring is already half ready, the next step is processing. It can be processed on sandpaper, and then polished using appropriate equipment, now I will show you photographs. Personally, I use a Dremel and appropriate brushes (goi paste).
That's it, our ring is ready, let's list the equipment used:
The first is the coin itself.
The second is the crossbar.
Third - a plastic hammer.
Fourth - a tool for making holes in a coin - a drill or whatever is convenient for you.


In principle, that’s all, if you have any comments, please write, if you have any questions, I’ll be happy to answer. If I remember something that I forgot to say, I’ll definitely write it, don’t judge strictly.
I can suggest the idea of making coin rings at home.
With a certain skill, you can master almost mass production of rings. How do you all know handmade, the so-called handmade is now valued and will allow you to have an additional source of income for your family.
Using the simple technology described below, you can make excellent rings of different sizes at home and even decorate them with patterns. Fortunately, in markets and in various thrift stores you can find plenty of material for the production of rings at low prices. For work, you can use both the recommended and other tools that, in your opinion, will simplify the process. But this is not the point - the main thing is the process itself and its stages. I’m telling you this, I’m doing it, and you decide - how is more convenient for you, you can improve my technology
To begin with, you will need a small, durable metal platform that will serve as an anvil base, a small hammer, an ordinary steel spoon and the coin itself. At first, it is recommended to choose coins minted from soft alloys.
Take a coin, place it on its edge, cover it with a spoon, the spherical shape of which is ideal for the first stage.
Using gentle blows of the hammer on the spoon, begin to flatten the edge of the coin. At this stage, do not rush and strike hard, be patient. Try to process the edge of the coin evenly, and periodically look at the intermediate results.
Then take your drill and start drilling a hole in the center of the coin. There is one very important point at this stage. It is necessary to make the hole “a little bit not all the way”, i.e. stop the drill as soon as it “hatches” on the reverse side. Thus, you will save yourself from the need to attach the coin to the rotation axis for further processing.
The drill will jam into the metal, allowing the process to continue.
Then take fine-grained sandpaper and begin sanding the outer part of the future ring. Look at the photo - comments are most likely unnecessary.
After this, prepare some kind of grip that can securely hold the coin. It is desirable that the gripping jaws have a curved shape rather than a straight one for a more secure hold. To protect the newly polished surface from scratches and dents, use paper pads (cloth, rubber, felt or other soft material).
The next step will require precision and patience. It is necessary to enlarge the hole in the center of the coin. Make sure that the drill does not “play” against the sides and ruin your previous efforts. There is no need to rush when performing this operation; feel like a jeweler doing painstaking work.
Then you need to smooth the inside of the ring using an emery roller.
Having achieved a good result, we proceed to the final stage of processing. We take a polishing wheel with an abrasive material applied to its surface and polish the inside of the almost finished ring, which no longer looks like a coin at all. Show neatness, trim unnecessary elements, etc.
That's basically all - enjoy the result! If everything works out, you like it and your hands grow from where they should, then you can make money by producing such rings. For serial production (even when working alone), I recommend performing all operations in stages. Those. First perform the first stage on all coins, then move on to drilling and grinding, and then to reaming and finishing.


Well, and one more thing....
Nowadays various unusual jewelry is in fashion. Things made with high quality by hand emphasize the uniqueness of their owner. We invite you to get acquainted with a master class on how to make a ring from an ordinary coin.
When making a coin ring, it is very important to first choose the right coin.
When selecting a coin, pay attention to the following parameters:
- safety;
- strength;
- color;
- size.
Coin rings made from materials such as silver, brass, steel, and bronze are not dangerous. You must be careful with coins containing nickel and copper, as they can cause skin diseases, allergies and poisoning of the body.
The colors of the coins are bronze-yellow and silver-steel. Bronze-yellow coins include Russian 10 and 50 kopecks, 1, 5, 10 and 50 rubles and Ukrainian 25 and 50 kopecks, 1 and 2 hryvnia.
You need to pay attention to the size of the coin, since a small coin cannot be used to make a large diameter ring. Regardless of the year of issue in Russia, coins of the following sizes: small - with a denomination of up to 1 ruble, medium - from 1 to 10 rubles; large ones - 5, 10, 20, 25, 50 and 100 rubles. In Ukraine, the size of coins in ascending order is as follows: the smallest are 1, 2 and 10 kopecks, then 25 and 50 kopecks, the largest are 5 kopecks, 1, 2 and 5 hryvnia.

For example, 50 kopecks of the USSR before 1931 are made of silver, the American Sacagawea dollar is made of a bronze alloy and is good for making rings with a large diameter, some EU coins are made of bronze alloys and of various sizes.
DIY coin ring: master class
You will need:
- coin;
- vice;
- power tools with attachments for grinding and polishing;
- drill;
- steel spoon;
- a metal platform that acts as an anvil;
- fine-grained sandpaper.
- We place the coin on the “anvil” edge-on, apply a spoon to it with the convex part and apply gentle blows evenly along the entire edge of the coin. We periodically check the shape of the workpiece.
- We stop when the edge of the coin becomes the width required for our ring.
- Using a nail or pointed object, mark the center of the coin.
- We drill a small hole in the center of the coin with a drill, stopping the drill as soon as its end passes through the coin. The drill will jam in the metal, allowing us to complete the next step. Be careful as the ring becomes hot when drilling and you may get burned.
- We take coarse sandpaper, and, turning on the drill so that the coin on the drill rotates, we process the outer parts of the ring blank. Then we take fine-grained sandpaper and repeat the processing.
- We carry out final processing of the outer surface. To do this, take a cloth, apply an abrasive compound and polish the surface with it. To obtain a mirror shine, we repeat this treatment several times.
- We clamp the coin in a vice, using pads in the form of cardboard or paper to protect it from scratches and dents.
- We enlarge the hole in the coin using a drill or other device. This is the most difficult and painstaking stage of the work, as there is a possibility of ruining the coin. Everything must be done carefully, slowly, periodically checking the fastening of the coin.
- Using a power tool with a sanding roller, smooth out the inside of the ring. After this stage, the edges of the product will become quite sharp.
- Using a file, we pass along the edges of the product on all sides at an angle of 45 degrees until they become more rounded.
- Using a polishing attachment with a small amount of abrasive material, we polish the inner surface of the product, removing all remaining roughness.


Our homemade coin ring is ready.
The year of manufacture is stamped on the coins. This means that you can make a ring from a coin with significant date for you or the person to whom you will give your product. This will be an original themed gift, made by yourself. The method proposed by the author of this idea is suitable for any coins.
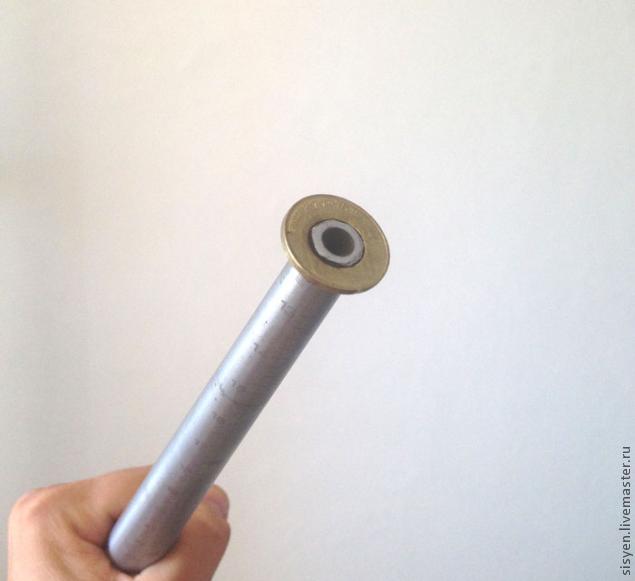
To make a ring from a coin disk, you need to make a hole in it and then unfold the resulting blank using a Morse taper. The smaller you make the hole, the wider the ring will be. However, it will be difficult to make a wide ring, since when unfolding the coin you will have to try not to tear it or crush it.
The actual work of turning the coin inside out is carried out with a stand with a wide hole. To do this, you can use a bearing, pipe end or other device. By heating the workpiece, you can protect it from rupture. Experience has shown that paper is a good protector that can protect the inside of the ring from damage. To push the workpiece, it is advisable to use an aluminum tube, since this metal is softer and will not damage the future ring.
After creating the ring blank, all that remains is to grind the product.
The second useful video from this master on the topic of coin rings.
As additional information Another video on the same topic, but with the approach of a foreign master.
And here is another video lesson on this topic.
Unique jewelry has always attracted attention; just remember the battles that took place in The Lord of the Rings. In this video you will learn how to make a unique ring with your own hands from an ordinary coin. In our case it will be rubles.
Mark the center of the coin and make a hole in it. We cut off the resulting burrs with a file. Then we need to put this blank on a metal rod. In the case shown, this will be the core. Having placed the emphasis on the board, we begin to carefully tap it and this must be done at an angle to the workpiece, so that the side of the coin with the pattern begins to turn outward.
Our workpiece has outgrown the core and now, to further bend the sides of the money and enlarge the hole, we will use a turned sleeve from the key and then a processed plumb line - ideally, it is better to have one rod with an increase from small to large diameter. If you have a vice, they will greatly simplify the task. But be careful, the vice can ruin the drawing.
Let's warm it up thoroughly and start forging ours. This process is very labor-intensive and you can hardly complete it in one hour. After we have achieved the desired size of the ring, we grind its ends on a grindstone and then process the edges with a round file.
When making the first coin, 2 mistakes were made that you should avoid. The author of the video did not immediately use heating of the coin and sanded the ring too much, but it turned out but without a pattern.
Let's make a second try. Let's make a ring from another coin with a face value of 1 ruble. Let's make a hole, warm it up thoroughly and start forging. We repeat this process until we get the desired result. After the ring has taken the required shape, we will process the edges. Next, we will begin to carefully sand it, and the most important thing here is not to sand off the entire drawing. With some skill, many will do much better.
You can also wear the ring yourself.
History of the idea
Once upon a time with the help silver coin and a hammer, designer Nicholas Heckman created a homemade ring for his girlfriend. No one expected it to turn out so well, and the relatives and the young lady herself were truly delighted with the work done. Subsequently, Heckman released a whole series of designer rings, which added to his fame and recognition. It happened that he had to suspend the sale of products because they were in amazing demand. to his practical guide Heckman shared it with the public and now everyone can become a home jeweler in a comfortable and convenient environment.
Tools for making a ring
Obviously, it is initially necessary to select a tool for making a hole in a coin; here the choice depends solely on ease of use and the manufacturer’s preferences, for example: a drill, a hammer (plastic) and a bolt - a completely standard set for this type of work. In order to give the coin ring shine and completeness, you will need a piece of sandpaper. It follows from this that in technically There shouldn’t be any difficulties in finding materials; everyone can act to the best of their ability and ingenuity.
Coin selection
In reality, the requirements for choosing a coin are not that extensive. There is a set of qualities that it must meet and be processed according to it to create a future product. First of all, it must be as durable as possible and not harmful to human life. In this case, brass, silver, bronze and steel are absolutely harmless. The color of the coin for the ring depends on individual preferences, but the size is a general indicator - coins with the equivalent of less than 1 ruble will not be suitable for work.
“Crazy hands” or “I myself”
When choosing a coin for a ring, pay attention to the choice of material; silver has a big advantage. The first step is to heat the coin until a bright red tint appears, but here it is important to find a middle ground and not overdo it, since the elements may suffer and the coin itself may take a shape that is not desirable for further work. At the end of this procedure, the coin must be immediately placed in cold water, a characteristic sound will be heard, but you should not be afraid of this, because this is considered an absolutely normal manifestation during such an interaction.
The next step in making a coin from a ring will be making a hole - this is a rather important moment, since it is important to monitor symmetry and thickness; the larger the hole, the correspondingly thinner the product. Then the hammer and bolt come into their own. For those who do not know what a bolt is, it is a tool for making chain links that visually looks like a rod that widens towards the bottom. The coin should be placed on the crossbar and be guided to the lower part with precise, gentle blows of the hammer, increasing in width. This is a rather labor-intensive process that requires concentration and patience. You need to focus on the mark that is located on the crossbar and indicates the completion of the work. Why a plastic hammer? Because any other method increases the risk of damage to the product tenfold. There is one more subtlety that must be taken into account. To prevent the product from visually becoming similar to a cone, it must be periodically removed from the crossbar and placed on the reverse side.
Video option
Grinding process
Grinding a coin ring is the most enjoyable process in making such a product. When the desired shape appeared and the coin turned into a real work of art, all that remained was to bring the matter to mind and give the ring a marketable appearance. Sandpaper not only adds shine, but also smoothes the surface of the ring, after which it becomes smooth and pleasant to the touch.
There is one more secret how you can add extra smoothness to a coin ring. To do this, use a regular spoon, which is needed for light tapping on the surface of the ring. Here, again, it is important to be careful and careful, because any intervention with more force than necessary can ruin everything that can be done up to that moment.
Safety precautions
Anyone who is going to create a ring from a coin should understand that this is a rather dangerous process,  which requires a certain approach and compliance with technical rules. The most important thing that a novice master should remember is safety glasses, which should not be removed at the entire stage of the work. A mask and specialized gloves are also important, since when interacting with heated metal, every mistake made can result in serious injury. The work area must also be appropriate to the occasion and protected from unwanted interference by production costs. All materials must be in sight, and the process itself must be carefully planned in advance. It should be remembered that when choosing a coin, preference is given to coins made of a soft alloy; they are more suitable for work and are appropriate for creating such a product.
Experience of professionals
In order to achieve maximum shine on a coin ring, sandpaper alone will not be enough and more experienced craftsmen suggest using an abrasive compound. This can be considered quite reasonable advice, since this composition is used to treat the surface of hard materials, be it metal or rocks.
In any case, only by mastering the initial techniques, you can create your own unique approach to making a ring and choose your own available tools that only you can masterfully handle.